Showing posts with label Linux Tricks. Show all posts

Wednesday, 18 December 2013

::: GLANCES : Linux Desktop Montioring Tool :::

Glances is a free (LGPL) cross-platform curses-based monitoring tool which aims to present a maximum of information in a minimum of space, ideally to fit in a classical 80x24 terminal or higher to have additionnal information. Glances can adapt dynamically the displayed information depending on the terminal size. It can also work in a client/server mode for remote monitoring.


This tool provide info about your server

1.CPU load
2.OS Name/Kernel version
3.System load
4.Disk and Network I/O
5.Process
6.Memory usage
7.Mount point and much more.

Installation

You can install Glances using pip command line tool. You will also find packages for Arch Linux, Fedora/CentOS/RHEL, Debian, Ubuntu (13.04+), FreeBSD, OSX and so you should be able to install it using your favorite package manager as follows:

Install Glances on CentOS/Fedora/RHEL/Scientific Linux

First, turn on Extra Packages for Enterprise Linux (or EPEL) repo on CentOS/RHEL/SL. Type the following yum command:
# yum -y install glances
Sample outputs:
yum install glances
Loaded plugins: product-id, protectbase, rhnplugin
This system is receiving updates from RHN Classic or RHN Satellite.
rhel-x86_64-server-6                                 | 1.5 kB     00:00
rhel-x86_64-server-optional-6                        | 1.5 kB     00:00
0 packages excluded due to repository protections
Setting up Install Process
Resolving Dependencies
--> Running transaction check
---> Package glances.noarch 0:1.7.1-1.el6 will be installed
--> Processing Dependency: python-psutil >= 0.4.1 for package: glances-1.7.1-1.el6.noarch
--> Processing Dependency: python-setuptools for package: glances-1.7.1-1.el6.noarch
--> Running transaction check
---> Package python-psutil.x86_64 0:0.6.1-1.el6 will be installed
---> Package python-setuptools.noarch 0:0.6.10-3.el6 will be installed
--> Finished Dependency Resolution
 
Dependencies Resolved
 
============================================================================
 Package             Arch     Version          Repository              Size
============================================================================
Installing:
 glances             noarch   1.7.1-1.el6      epel                   107 k
Installing for dependencies:
 python-psutil       x86_64   0.6.1-1.el6      epel                    84 k
 python-setuptools   noarch   0.6.10-3.el6     rhel-x86_64-server-6   336 k
 
Transaction Summary
============================================================================
Install       3 Package(s)
 
Total download size: 527 k
Installed size: 843 k
Is this ok [y/N]: y
Downloading Packages:
(1/3): glances-1.7.1-1.el6.noarch.rpm                | 107 kB     00:00
(2/3): python-psutil-0.6.1-1.el6.x86_64.rpm          |  84 kB     00:00
(3/3): python-setuptools-0.6.10-3.el6.noarch.rpm     | 336 kB     00:00
----------------------------------------------------------------------------
Total                                       1.8 MB/s | 527 kB     00:00
Running rpm_check_debug
Running Transaction Test
Transaction Test Succeeded
Running Transaction
  Installing : python-psutil-0.6.1-1.el6.x86_64                         1/3
  Installing : python-setuptools-0.6.10-3.el6.noarch                    2/3
  Installing : glances-1.7.1-1.el6.noarch                               3/3
  Verifying  : python-setuptools-0.6.10-3.el6.noarch                    1/3
  Verifying  : python-psutil-0.6.1-1.el6.x86_64                         2/3
  Verifying  : glances-1.7.1-1.el6.noarch                               3/3
 
Installed:
  glances.noarch 0:1.7.1-1.el6
 
Dependency Installed:
  python-psutil.x86_64 0:0.6.1-1.el6
  python-setuptools.noarch 0:0.6.10-3.el6
 
Complete!
 

Install Glances on Debian/Ubuntu Linux (13.04+)

Type the following command:
$ sudo apt-get install glances

How do I use glances?

The basic syntax is:
# glances
# glances [options]

Sample outputs:
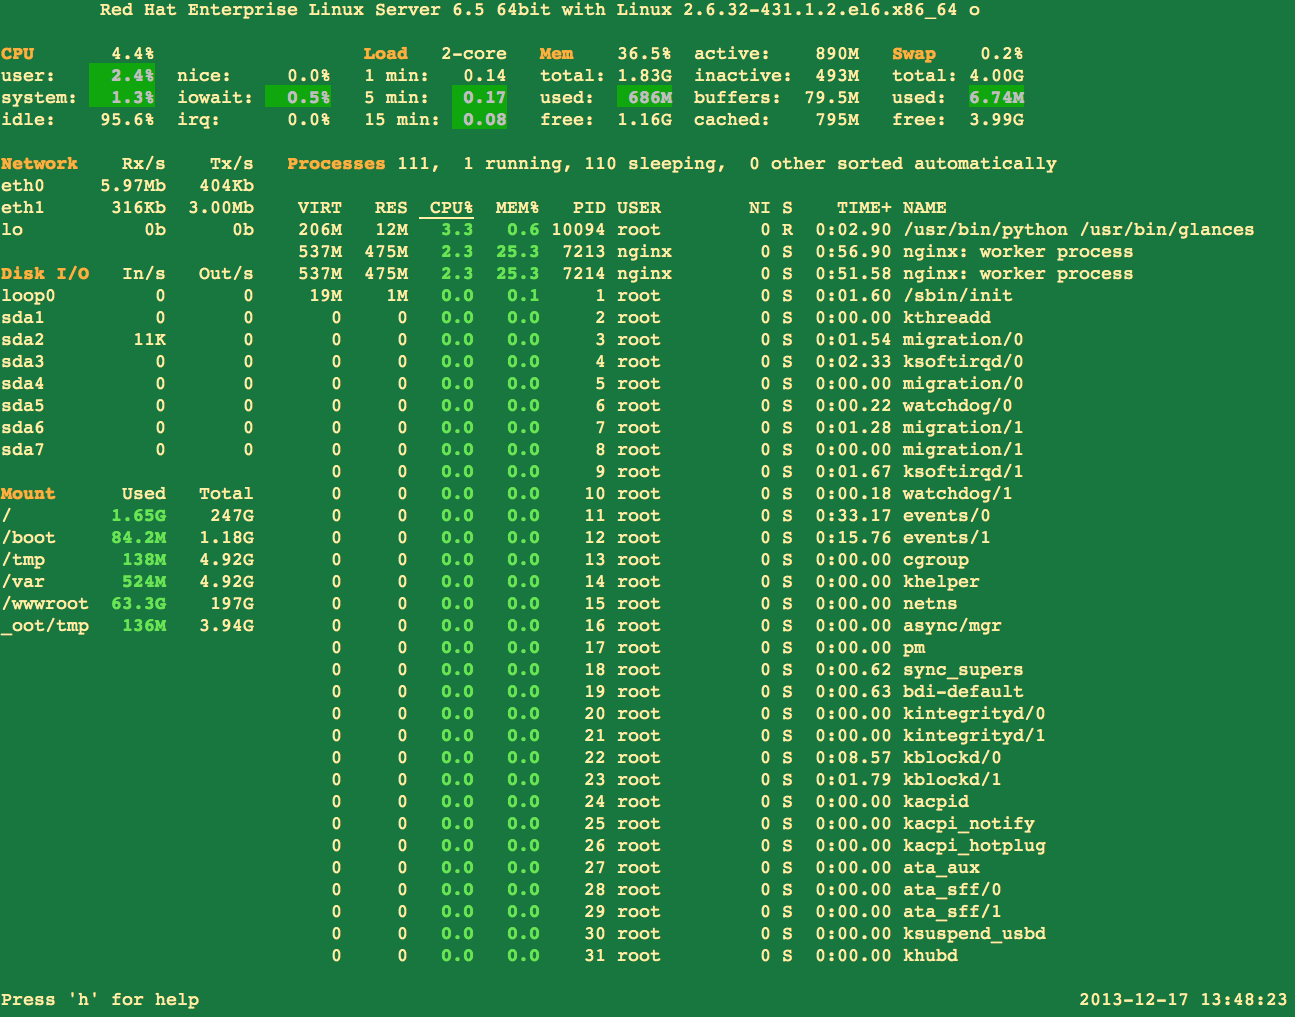
Fig.01: glances in action (click to enlarge)

To quit just press q (Esc and Ctrl-C also work). Here is another output from Ubuntu based system:
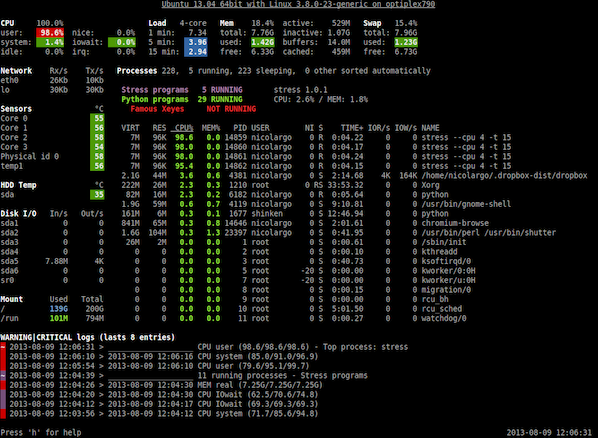
Fig.02: Glances in action (Image credit - Glances author)
HTML5 capable browser user can view quick video demo by clicking the following link:

Fine tuning output (interactive commands)

Use the following hot keys to find tune your output:
  • a Sort processes automatically.
  • c Sort processes by CPU%.
  • m Sort processes by MEM%.
  • p Sort processes by name.
  • i Sort processes by I/O rate.
  • d Show/hide disk I/O stats.
  • f Show/hide file system stats.
  • n Show/hide network stats.
  • s Show/hide sensors stats.
  • y Show/hide hddtemp stats.
  • l Show/hide logs.
  • b Bytes or bits for network I/O.
  • w Delete warning logs.
  • x Delete warning and critical logs.
  • 1 Global CPU or per-CPU stats.
  • t View network I/O as combination.
  • u - View cumulative network I/O.

How do I use Glances in client/server mode?

On server type the following command to bind server to the given IPv4/IPv6 address or hostname:
# glances -B @IP|host
# glances -B 75.126.153.206
# glances -B www.cyberciti.biz

From your desktop client such as OSX/FreeBSD/Linux based system type the following command to connect to a Glances server by IPv4/IPv6 address or hostname:
# glances -c @IP|host
# glances -c 75.126.153.206
# glances -c www.cyberciti.biz

You may need to pass the -P password to set a client/server password. The -s run Glances in server mode:

How do I refresh information every 5 seconds?

Type the following command:
# glances -t 5
More info check source : http://www.cyberciti.biz , https://github.com/nicolargo/glances


Wednesday, 11 December 2013

::: New w0rm (Linux.Darlloz) Creates Havoc for Linux PC's :::

What is Computer W0rm ?
A computer worm is a standalone malware computer program that replicates itself in order to spread to other computers.Often, it uses a computer network to spread itself, relying on security failures on the target computer to access it. Unlike a computer virus, it does not need to attach itself to an existing program. Worms almost always cause at least some harm to the network, even if only by consuming bandwidth, whereas viruses almost always corrupt or modify files on a targeted computer.

Linux.Darlloz - A new worm is targeting x86 computers running Linux and PHP, and variants may also pose a threat to devices such as home routers and set-top boxes based on other chip architectures.

According to security researchers from Symantec, the malware spreads by exploiting a vulnerability in php-cgi, a component that allows PHP to run in the Common Gateway Interface (CGI) configuration. The vulnerability is tracked as CVE-2012-1823 and was patched in PHP 5.4.3 and PHP 5.3.13 in May 2012.

The new worm, which was named Linux.Darlloz, is based on proof-of-concept code released in late October, the Symantec researchers said Wednesday in a blog post.

For more details : check the link

source : www.computerworld.com , www.symantec.com


Monday, 17 June 2013

How to get a progress bar while copying huge files - ::: Linux tricks:::

Normally cp command does not give you any output while you are copying files. You have no idea how much copying is left to be done. However you can use a slightly different command to copy large with a progress bar shown. pv command does things better.
$ cat originalfile.txt | pv > newfile.txt


ome random, super-cool commands in Linux

  • A stopwatch on the terminal
    $ time read
    This will start a stopwatch on your terminal. Simply press Ctrl+D to stop the timer and see the elapsed time.
  • How to know how many CPU cores are there on the computer ?
    $ sudo cat /proc/cpuinfo | grep processor | wc -l
    Infact, you can see a lot of info about each of these cores with the command
    $ sudo cat /proc/cpuinfo
  • Finding the name of the linux distro running on the computer
    $ sudo cat /etc/issue
  • How to know whether you have a 32bit or 64bit OS running on your computer ?
    $ sudo getconf LONG_BIT
  • Killing a process that has locked a particular file, when you know the file name that is locked, but don’t know which process is locking it.
    $ sudo fuser -k <file_name>
    This is useful when you get an error saying this particular file is locked by another process. This happens many times when you are updating your linux installation and the process got terminated leaving the /var/lib/dpkg/cache file locked. You get an error when you try to re-start the system update again. You can use this command in such situations.
  • Easiest way to re-run the previous command with superuser permissions
    $ sudo !!
This saves you from pressing up arrow and then home key and then typing sudo.
  • Easily doing a reverse search for a command you entered previously. In bash, simply press Ctrl+R and then start typing the part of the comamnd you remember. Hit enter when you find the command you were looking for. This command gives rise to another neat trick. Suppose you use a lengthy command very frequently during the session. The first time you run the long command, run it as follows
    $ <command> #my_label
    The next time you want to run the same command, all you have to do is press Ctrl+R to start reverse-search and then enter “my_label” followed by enter key… How cool is that !!!.
  • How to get vi stlye editing commands working in bash
    $ echo "set editing-mode vi" > ~/.inputrc
  • some super useful bash command editing keys
    - Press Ctrl+W to erase a single word before the current cursor position.
    - Press Ctrl+U to erase the entire line before the current cursor position.
    - Press Ctrl+K to erase the entire line after the current cursor position.
    - Press Ctrl+A to go to the beginning of the command.
    - Press Ctrl+E to go the the end of the command.
  • How to display a popup notification when a command completes ( requires libnotify to be installed )
    $ wget <URL> ; notify-send "wget" "your download is complete"
    The above command displays a popup notification once wget finishes downloading the file. wget can be replaced by any command actually. The first argument to the notify-send command is the “title” and the second argument is the “body” of the popup notification. You can change it to whatever you like.
  • Turning of the monitor to save power when there is no hardware key available to do so(say, on a laptop)
    $ xset dpms force off
  • How to copy the output of any command directly to the system clipboard
    $ <command> | xsel --clipboard
  • How to open an file from the command line using the default application for that file
    $ xdg-open <file_name>
  • How to save the output of any command as an image file
    $ <command> | convert label:@- <image_name.png>
  • How to convert an entire man page into pdf format for later viewing
    $ man -t <command_name> | ps2pdf - <command_name.pdf>
  • Installing the same packages and software you already have on a fully configured linux system, on another freshly installed linux system in a single command
    First, run this command on the fully configured linux box
    $ sudo dpkg --get-selections > my_linux_software
    Then, transfer this file to the freshly installed linux box an enter the following command
    $ cat may_linux_software|sudo dpkg --set-selections && sudo dselect install
    Ofcourse, you will need network connection on your freshly installed linux box, but you will be saved from laboriously selecting all your favorite software from the software management tool.
  • Deleting a particular line number from a given file without opening it in any editor
    $ sed -i 8d <file_name>
    This command deletes the 8th line from the specified file.
  • Running a command at a specified time
    $ echo "command you want to run | at 01:00
    Note that the time is in 24hr format.
  • How to create a pencil sketch out of any image file
    $ convert <input_image> -colorspace gray \( +clone -blur 0x2 \) \
      +swap -compose divide -composite -linear-stretch 5%x0% <output_image>
    You can ofcourse add an alias or better still, a bash function for such long commands in your ~/.bashrc to make your life easier.
  • How to check unread mail from your gmail inbox from the command line
    $ curl -u your_email@gmail.com:your_password --silent \
      "https://mail.google.com/mail/feed/atom" | tr -d '\n' | \
      awk -F '<entry>' '{for (i=2; i<=NF; i++) {print $i}}' | \
      sed -n "s/<title>\(.*\)<\/title><summary>\(.*\)<\/summary.*name>\
      \(.*\)<\/name><email>\(.*\)<\/email>.*/\n\3\(\4\) - \1 - \2\n/p"
    This command might look like too much to handle, but it is really extremely simple. All it is doing is reading from your gmail account’s atom feed and formatting the output using awk and sed. As before, you are better of creating an alias(or a bash function) in your ~/.bashrc for this command.

Hiding a file or directory within an image - ::: Linux Tricks:::

This is one severely cool trick which allows you to hide any file or directory within a harmless looking image. When you click on such a file, all you see is the image on your default image viewer. The image is not altered in any way. What you don’t see is the file you have hidden within the image…. Here is precisely how to do it.
  • First you will need a harmless looking .png or .jpg image file… Feel free to download your favorite one from google images.
  • Now, the file or directory you wish to hide has to be compressed into a zip archive.
    $ zip -r <compressed.zip> <file1> <dir1>
  • Now, cat the image you downloaded with the compressed file you created above
    $ cat image.png compressed.zip > secret.png
    NOTE: do not change the ordering of the image and the compressed file. The image always has to always come first in the cat command.
  • Now, remove the files and directories you wanted to hide and also the compressed.zip file using the rm command.
Thats it… You now have a file by the name “secret.png” which if you open, will display the harmless looking image file. Nobody suspects that the image is hiding something sinister(unless ofcourse they are intelligent enough to do a ls -l and see the size of the image file)
Now, all you have to do to get back your secret files and directories is
$ unzip secret.png
Don’t worry if you get some weird warnings or errors when you run the command regarding some invalid content in the header. Thats the whole point you see !!! When we catted the image file at the start of the zip file, we inadvertently modified the header of secret.png, and hence the warnings and errors. Nonetheless, you should now see the compressed.zip file in the directory. Just extract its secret contents with
$ unzip compressed.zip

Creating a bootable USB disk - ::: LINUX TRICKS :::

Now, that you know how to create a bootable cdrom, you have to admit, it is a bit of a pain to buy and burn a cdrom every time you want to try a new linux distro and then wait forever until the OS is installed from the super-slow cd rom. The solution is to create a bootable usb disk and the procedure to create one, assuming you already have a partitioned and formatted pendrive, couldn’t have been more easier. All you have to do is
$ dd if=mylinux.iso of=/dev/sdb bs=20M
Here if stands for input file, of for output file and bs for block-size.
After this, make sure you flush the write buffers to disk by issuing the command
$ sync
Here /dev/sdb is the device file that represents your usb pendrive. It may be different on your system. But it is always something like sdb or sdc. To find out exactly, plug in your usb disk and then run ‘$ sudo fdisk -l’. You should be able to see a partition table for your pendrive at the bottom and also atleast one partition which would be something like sdb1 or sdc1. However, if you haven’t formatted your pendrive before and want to learn how to do it from the command line, then read the next section.
If you haven’t already realized, you can do amazing things with the dd command. You can create a backup of an entire hard disk partition by
$ dd if=/dev/sda1 of=/dev/sda2
This command copied the entire partition sda1 on your hard disk to partition sda2. You can restore the partition simply by interchanging the if and of attributes. However, exercise extreme caution while using the dd command as you can completely mess up your hard drive and lose all data if you specify the if and of attributes wrongly.

Writing an ISO image file to a CDROM from the command line - :::LINUX TRICKS :::

We usually download .iso images of popular linux distros for installation or as live media, but end up using a GUI cd burning tool to create a bootable cdrom. But, if your feeling a bit geeky, you could try doing so from the command line with
$ cdrecord -v speed=0 driveopts=burnfree -eject dev=1,0,0 <src_iso_file>
speed=0 tells the program to write the disk at the lowest possible drive speed. But, if you are in a hurry, you can try speed=1 or speed=2. Keep in mind that these are relative speeds.
-eject switch tells the program to eject the cdrom after the operation is complete.
Now, the most important part… specifying the device id. It is absolutely important that you specify the device id of your cd rom drive correctly or you may end up writing the iso to some other place on disk and corrupting your entire hard disk. To find out the device id of your cd-rom drive, just run this command prior to running the first command:
$ cdrecord -scanbus
Your cd-roms device id should look something like 1,0,0 but need not be exactly the same on your system.
Also, note that, you cannot create a bootable dvd disk using this command for distros like openSUSE or Fedora or Ubuntu or Slackware which come as dvd iso’s. But, do not be disheartened, there is another more simpler command to burn a bootable dvd
$ growisofs -dvd-compat -speed=0 -Z /dev/dvd=myfile.iso
Here, /dev/dvd is the device file that represents your dvd rom. It is quite likely to be the same on your system as well.
Donot use growisofs to burn a cdrom. The beauty of linux is that a single command does a single operation and does it well. So, we will stick to it.

Splitting, compressing and encrypting files before transfering to others ::: LINUX tricks :::

We all at some point have had to deal with transferring large files across computers. The obvious method is to compress it before sending. For extremely large files we can create a multi-part archive using the following commands.
  • First of all, create a zip archive using
    $ zip -re <compressed_file_name.zip> <file1> <dir1>
    The -r switch allows you to add directories to the archive.
    The -e switch allows encryption, where the program asks you to enter a passphrase that needs to be entered by the recepient in order to extract the archive.
  • Now split the archive into multiple parts with
    $ split --bytes=1K <compressed_file_name.zip> <PREFIX>
    Here, - -bytes=1K specifies that we want parts that are at most 1K bytes in size.
    PREFIX is any user string… For example, if the PREFIX is given as “split_”, then the files that are created will be named split_aa, split_ab, split_ac, etc.
  • On the receiving side, you can extract the multipart zip archive with
    $ cat split_* > my_compressed_file.zip
    Where, “split_” was the PREFIX that the person who created the archive specified.
    Then, extract the whole zip file as follows.
    $ unzip my_compressed_file.zip